Update: Downloading and running Wookie has changed since this was written and some of the links seem broken. please check http://incubator.apache.org/wookie/downloading-and-installing-wookie.html for latest instructions
The Wookie server is open source software in development for delivering collaborative widgets that follows the w3c widget specification. Although it is early days for Wookie I desperately wanted to try my hand at writing some widgets; along the way I found that online tutorials were often written for specific platforms (Yahoo, Mac, etc) and it was quite daunting for the first few attempts.
Getting Started
First you will need download and install the Widget Server. The easiest method is to use the ‘Quick Start Distribution’ which is offered by the Tencompetence Website and includes:
- CopperCore Runtime Environment(CCRT)
- Sled Player
- Widget Server
The Quick Start Distribution is available here
Once you have downloaded the environment unzip it with your favorite compression tool and run the file coppercore.bat. Once the script has finished you should be able to use the following URLS a web browser:
http://localhost:8080/wookie to access the Wookie Widget Server index page
http://localhost:8080/sled3 to access the SLeD player
For this tutorial we are interested in the Wookie Player; you should now be able to access the Wookie index page via http://localhost:8080/wookie
Creating a Widget
For this example we are going to create a very simple widget that displays a calendar. Hopefully this will familiar ourselves with the way in which we create, upload, initiate and access widgets in Wookie; all we will need for this is any old text editor. The code required to make the calendar is available freely from the JavaScript Source WebsiteFirst we need to create a directory that will contain our widgets files, I have called mine ‘calendar’ and stored it on my desktop. For this simple widget we will need to create four files within this directory:
- The Configuration document – To tell the server what to do with our widget
- HTML page – The page the user will see
- CSS file – A file describing the style of the HTML page
- A JavaScript file – To store the code that will make our calendar work.
Configuration Document
The configuration document is an XML file that should be named config.xml and is required by the Wookie server to configure the widget. To create one open up your text editor then copy and paste the following:
<?xml version="1.0" encoding="UTF-8" ?><widget chrome="" height="0" id="http://www.tencompetence.org/calendarWidget"
start ="calendar.htm" version="9" width="0"
xmlns="http://http://www.w3.org/ns/widgets"
xmlns:xsi="http://www.w3.org/2001/XMLSchema-instance"
xsi:schemaLocation="http://http://www.w3.org/ns/widgets w3cwidgets.xsd"> <title>The calendar widget!</title>
<description>A sample calendar widget for demonstration purpose</description>
<author>David Sherlock</author>
</widget>This contains the bare minimum that is required by the widget server; you should change my name and details and then save the file as config.xml.
HTML file
Since the CSS and Javascript files contain detail on how to the calendar will be created and displayed the HTML file is minimal:
<html>
<head>
 <link rel="stylesheet" href="calendar.css" type="text/css"/>
 <script type='text/javascript' src='calendar.js'> </script>
</head>
<body>
<script type="text/javascript">writeCalendar()</script>
</body>
</html>
This simply specifies the CSS and JavaScript files, this should now be saved within the same directory as our config.xml as calendar.htm.
Javascript and CSS files
Finally we need to create the Javascript and CSS that will create the calendar; this example has been taken from the Javascript Source website.
The CSS should be copied in to a file within our directory called calendar.css:
span.label {
color:black;
width:30;
height:16;
text-align:center;
margin-top:0;
background:#ffF;
font:bold 13px Arial
}

span.c1 {
cursor:hand;
color:black;
width:30;
height:16;
text-align:center;
margin-top:0;
background:#ffF;
font:bold 13px Arial
}

span.c2 {
cursor:hand;
color:red;
width:30;
height:16;
text-align:center;
margin-top:0;
background:#ffF;
font:bold 13px Arial
}

span.c3 {
cursor:hand;
color:#b0b0b0;
width:30;
height:16;
text-align:center;
margin-top:0;
background:#ffF;
font:bold 12px Arial
}
The accompanying JavaScript should also be stored in our working directory within a file called calendar.js. you can get the required JavaScript from here:
function maxDays(mm, yyyy){
var mDay;
if((mm == 3) || (mm == 5) || (mm == 8) || (mm == 10)){
mDay = 30;
}
else{
mDay = 31
if(mm == 1){
if (yyyy/4 - parseInt(yyyy/4) != 0){
mDay = 28
}
else{
mDay = 29
}
}
}
return mDay;
}
function changeBg(id){
if (eval(id).style.backgroundColor != "yellow"){
eval(id).style.backgroundColor = "yellow"
}
else{
eval(id).style.backgroundColor = "#ffffff"
}
}
function writeCalendar(){
var now = new Date
var dd = now.getDate()
var mm = now.getMonth()
var dow = now.getDay()
var yyyy = now.getFullYear()
var arrM = new Array("January","February","March","April","May","June","July","August","September","October","November","December")
var arrY = new Array()
for (ii=0;ii<=4;ii++){
arrY[ii] = yyyy - 2 + ii
}
var arrD = new Array("Sun","Mon","Tue","Wed","Thu","Fri","Sat")

var text = ""
text = "<form name=calForm>"
text += "<table border=1>"
text += "<tr><td>"
text += "<table width=100%><tr>"
text += "<td align=left>"
text += "<select name=selMonth onChange='changeCal()'>"
for (ii=0;ii<=11;ii++){
if (ii==mm){
text += "<option value= " + ii + " Selected>" + arrM[ii] + "</option>"
}
else{
text += "<option value= " + ii + ">" + arrM[ii] + "</option>"
}
}
text += "</select>"
text += "</td>"
text += "<td align=right>"
text += "<select name=selYear onChange='changeCal()'>"
for (ii=0;ii<=4;ii++){
if (ii==2){
text += "<option value= " + arrY[ii] + " Selected>" + arrY[ii] + "</option>"
}
else{
text += "<option value= " + arrY[ii] + ">" + arrY[ii] + "</option>"
}
}
text += "</select>"
text += "</td>"
text += "</tr></table>"
text += "</td></tr>"
text += "<tr><td>"
text += "<table border=1>"
text += "<tr>"
for (ii=0;ii<=6;ii++){
text += "<td align=center><span class=label>" + arrD[ii] + "</span></td>"
}
text += "</tr>"
aa = 0
for (kk=0;kk<=5;kk++){
text += "<tr>"
for (ii=0;ii<=6;ii++){
text += "<td align=center><span id=sp" + aa + " onClick='changeBg(this.id)'>1</span></td>"
aa += 1
}
text += "</tr>"
}
text += "</table>"
text += "</td></tr>"
text += "</table>"
text += "</form>"
document.write(text)
changeCal()
}
function changeCal(){
var now = new Date
var dd = now.getDate()
var mm = now.getMonth()
var dow = now.getDay()
var yyyy = now.getFullYear()
var currM = parseInt(document.calForm.selMonth.value)
var prevM
if (currM!=0){
prevM = currM - 1
}
else{
prevM = 11
}
var currY = parseInt(document.calForm.selYear.value)
var mmyyyy = new Date()
mmyyyy.setFullYear(currY)
mmyyyy.setMonth(currM)
mmyyyy.setDate(1)
var day1 = mmyyyy.getDay()
if (day1 == 0){
day1 = 7
}
var arrN = new Array(41)
var aa
for (ii=0;ii<day1;ii++){
arrN[ii] = maxDays((prevM),currY) - day1 + ii + 1
}
aa = 1
for (ii=day1;ii<=day1+maxDays(currM,currY)-1;ii++){
arrN[ii] = aa
aa += 1
}
aa = 1
for (ii=day1+maxDays(currM,currY);ii<=41;ii++){
arrN[ii] = aa
aa += 1
}
for (ii=0;ii<=41;ii++){
eval("sp"+ii).style.backgroundColor = "#FFFFFF"
}
var dCount = 0
for (ii=0;ii<=41;ii++){
if (((ii<7)&&(arrN[ii]>20))||((ii>27)&&(arrN[ii]<20))){
eval("sp"+ii).innerHTML = arrN[ii]
eval("sp"+ii).className = "c3"
}
else{
eval("sp"+ii).innerHTML = arrN[ii]
if ((dCount==0)||(dCount==6)){
eval("sp"+ii).className = "c2"
}
else{
eval("sp"+ii).className = "c1"
}
if ((arrN[ii]==dd)&&(mm==currM)&&(yyyy==currY)){
eval("sp"+ii).style.backgroundColor="#90EE90"
}
}
dCount += 1
if (dCount>6){
dCount=0
}
}
}
Packing and uploading
Now we should have 4 files within our directory:
- config.xml
- calendar.js
- calendar.css
- calendar.htm
For the Wookie server to accept these we have to turn them into a Widget Resource by creating a valid Zip archive out of them. In Windows XP this can be done by selecting all the files, right clicking one and sending it to a Zip archive:
Initializing Widget
Our newly created Widget Resource is now ready to be installed on the Wookie Server. First we must make sure that the environment is running, if it is not already start the coppercore.bat that we downloaded earlier. Once this has run its course navigate a browser to the Wookie Servers index page at http://localhost:8080/wookie. From here we click on the ‘admin’ link (the default username and password is java/java) to get to the administration admin page:
There are four steps now we must follow to run our widget:
- Create a Service for it
- Upload the widget
- Set the widget as default for our service
- Initialize the widget
Creating a Service
First we are going to create a service for our Widget; by clicking ‘add a new service type’. There are four default services with the server; these are chat, discussion, forum and vote. Our calendar doesn’t fit into any of these services so we will add one ourselves. Type ‘calendar’ into the box on the right and press add, once the service is added we can press menu to return to the front page.
Uploading Setting Widget as Service Default
From the menu screen click ‘add new widget’, the widget server will then ask for a valid zip file; browse to the zip file we created before and click upload. Once the widget has been uploaded it will ask which services it belongs to, choose calendar and press submit.
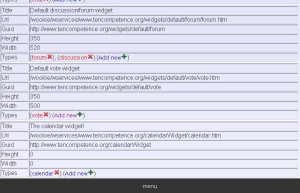
Now we have added the widget to our new service type we want to set it as the default widget for that service, return to the administration menu and choose ‘view existing widgets’. You should now see our calendar widget on the list assigned to calendar service type. To set this as the default widget for the calendar service simply click the blue word calendar.
Initializing Widget
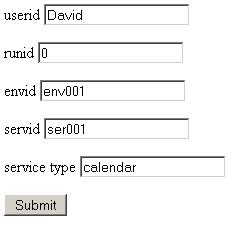
Finally we can initialize and use the widget; we no longer need the Wookie administration page so navigate back to the index page at http://localhost:8080/wookie/ and click initiate. The following screen will ask for parameters for the widget you wish to create; here we will change the user ID to any name you wish and the service to the calendar service we created before.
Once we click submit the form should return an XML document; for now we are interested in the URL element of this document.
Copy and paste the URL from your XML document into the Web browser and you should be presented with the widget we created!
The Javascript and CSS used to create the calendar are freely avalible here.
Further Reading
http://www.tencompetence.org/ldruntime/
http://javascript.internet.com/time-date/calendar.html


5 Comments
Directory · February 5, 2009 at 4:27 pm
Very informative article, which I found quite useful. Cheers ,Jay
Esteban · February 18, 2011 at 8:36 pm
Hi, good article, but can not find the file Widget Server in http://www.tencompetence.org/ldruntime/downloads/ccrt_3.1_widget_system_v1_2_1.zip ,
Could you provide a link to the file?.. thanks
James Simpson · March 18, 2011 at 10:57 am
Good little article, but the links provided for the quick install server does not exist.
dms2ect · April 12, 2011 at 10:41 am
The download info is a little out of date. To grab wookie you want to head to: http://incubator.apache.org/wookie/downloading-and-installing-wookie.html. If you still get stuck I’ll update the tutorial.
Widget working group start up meeting | Sheila’s work blog · February 2, 2009 at 2:50 pm
[…] In terms of infrastructure, two main approaches to widget development and deployment were discussed. These came from the 10Competence team at University of Bolton and the CARET team, University of Cambridge. The Bolton team have developed their own widget server (called wookie) and have been developing a number of collaborative, shared state widgets (such as chat, voting etc) using (and extending) the W3C widget specification. These can be deployed in a number of systems including Moodle and elgg (see previous blog and David’s post re creating widgets for wookie). […]